By re-planning private IP addresses, you can clearly distinguish the roles of VCS clusters (such as App vs. Database), improving management efficiency.
Even if your VCS instance has already been deployed, you can follow these steps to replace the private IP while retaining the external connectivity of the original static IP. This optimizes the network structure and makes management more intuitive and clear.
Procedure
Step 1. Create and Add a Detached Virtual Network Interface (VNI)
-
For instructions on how to create/add a network interface and specify a private IP, please refer to:https://docs.twcc.ai/docs/concepts-tutorials/twcc/vcs/tutorials/add-vni-to-instance
-
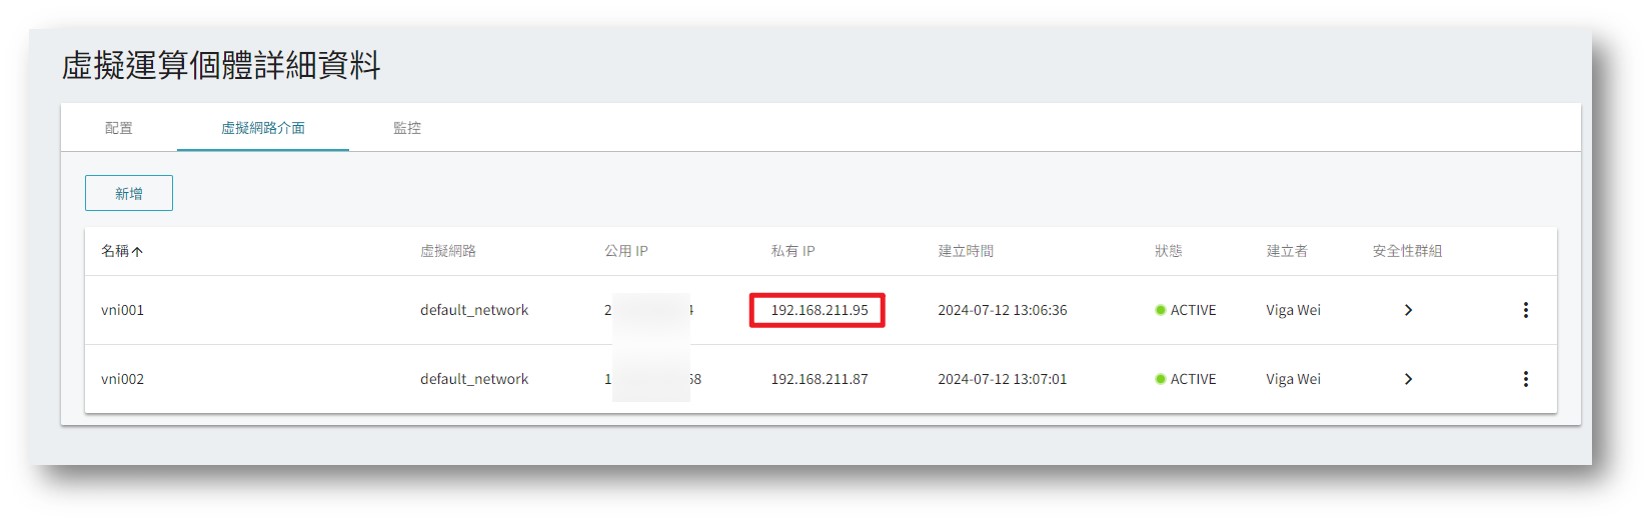
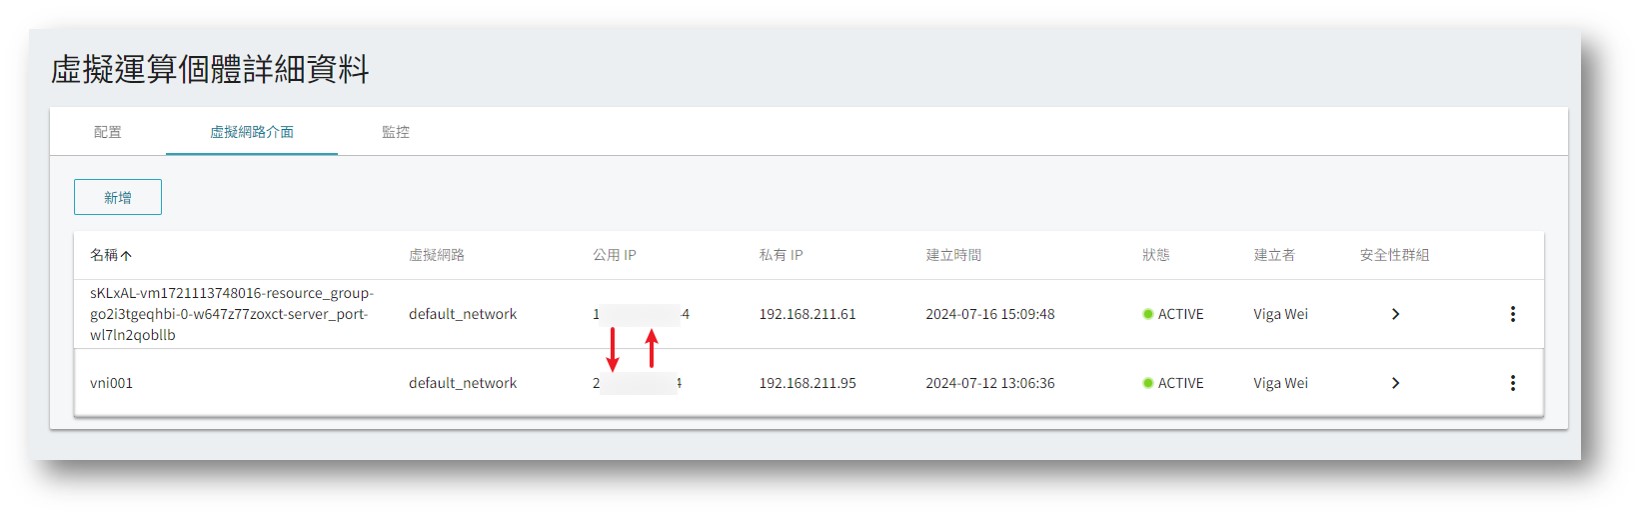
In this VCS example, there are currently two virtual network interfaces. The system is currently using the Attached Interface (created with the VCS). The goal is to switch to using the Independent Interface for both public and private IP:
- Attached Interface (Private IP: 192.168.211.61)
- Independent interface (Private IP: 192.168.211.95)

Step 2. Create an Image to Save Original Settings
To avoid connection loss due to configuration errors within the OS, it is recommended to create a VCS image first. This allows you to restore the VCS if any adjustments go wrong.
How to create a VCS image:https://docs.twcc.ai/docs/user-guides/twcc/vcs/instances/create-images
Step 3. Adjust Interface Priority or Disable the Original Interface in the OS
Connect to the VCS to adjust the interface order or disable the original interface:
Linux (using Ubuntu as an example)
- Use
"ip a"to confirm the identifiers (ensx) for the two interfaces:
- ens3: 192.168.211.61 (Attached interface) – 100
- ens6: 192.168.211.95 (Independent Interface) – 106

The smaller the metric value of an interface, the higher it is used in the sorting. Therefore, after confirming the metric value, the next step is to adjust the sorting of individual interfaces to be moved forward.
2. Adjust network interface metric values
sudo vim /etc/netplan/01-netcfg.yaml
- Lower the independent interface's metric (e.g., from 106 to 99). Save and exit (:wq!).
wq!Save and leave
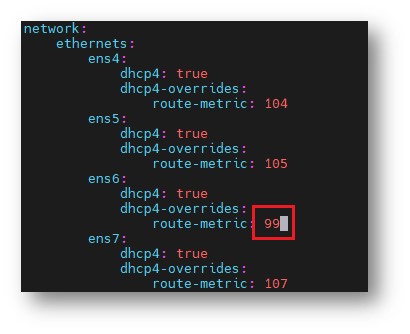
3. sudo netplan try
Confirm the new configuration. Once successful, the connection using the attached interface’s public IP will drop, indicating the settings have taken effect.

4. Use the indepent interface's public IP to connect. Success indicates the switch is complete.
Linux (using Rocky Linux as an example)
- Use
ip aObtain and copy the independent interface (ens4) with the following information:- MAC address:
fa:16:xx:xx:xx:a0
- MAC address:
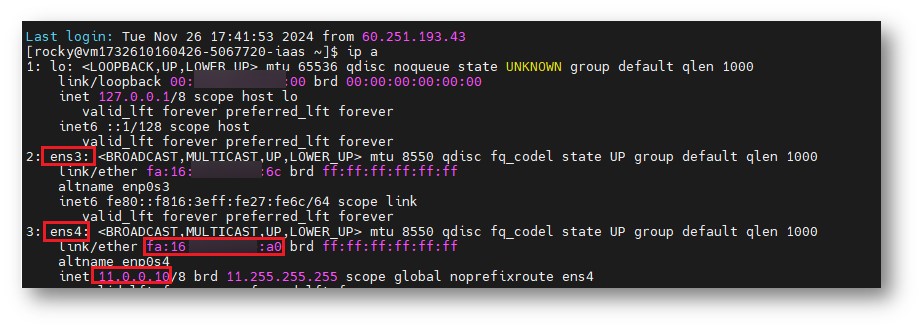
- Create an independent interface (ens4) profile and adjust its contents.
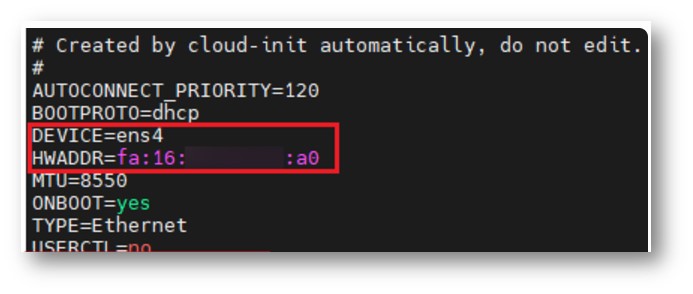
cd /etc/sysconfig/network-scripts/sudo cp ifcfg-ens3 ifcfg-ens4sudo vi ifcfg-ens4- Adjust the following content:
- DEVICE=
ens3Change toens4 - HWADDR= will be the original
ens3offa:16:xx:xx:xx:6cMAC address changed toens4offa:16:xx:xx:xx:a0
- DEVICE=
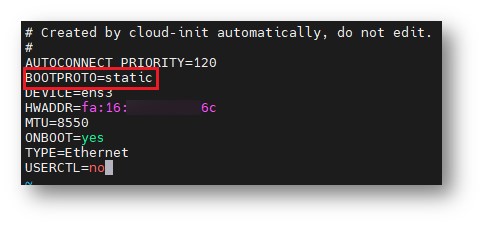
- Adjust the contents of the dependent interface (ens3) configuration file.
sudo vi ifcfg-ens3- BOOTPROTO=
dhcpChange tostatic
-
sudo rebootPerform a reboot to complete the settings. -
After booting up, connect to the VCS using the external IP address of the independent interface. If the connection is successful, it indicates that the network card has been successfully replaced with an independent one, and the original interface with the external IP address can no longer connect to the VCS.
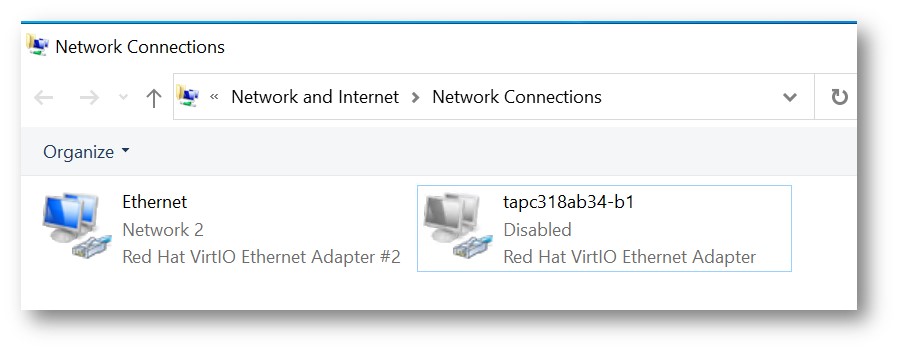
Windows (using Windows Server as an example)
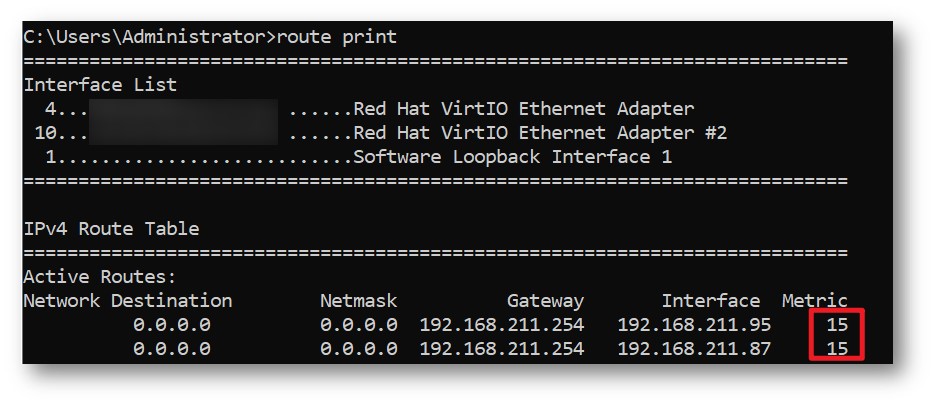
Windows network adapters all have a default metric of 15, so they can be used simultaneously.
If you wish to disable the original interface, please refer to the following procedure:
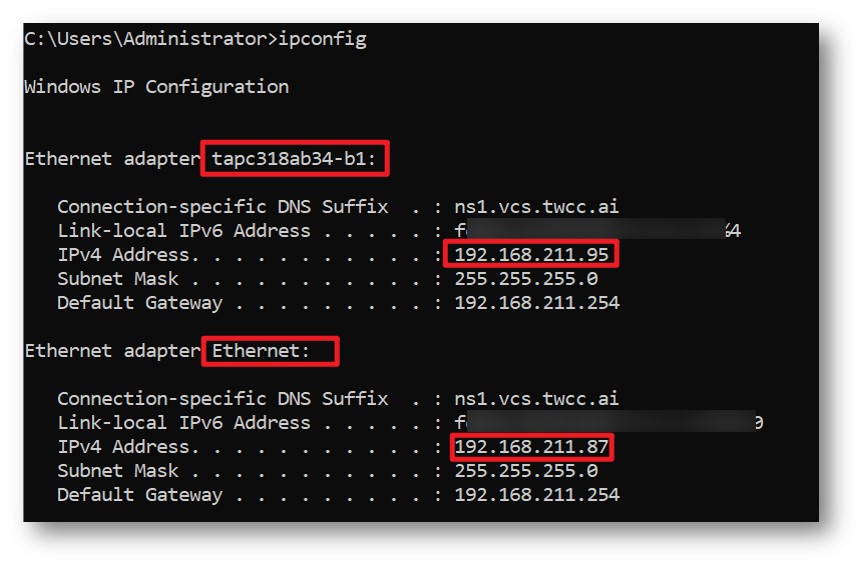
- Open CMD and type:
ipconfigConfirm the mapping between the interface name within the OS and the private IP address.

- enter
netsh interface set interface "name of the interface to be disabled""It can be stopped immediately.

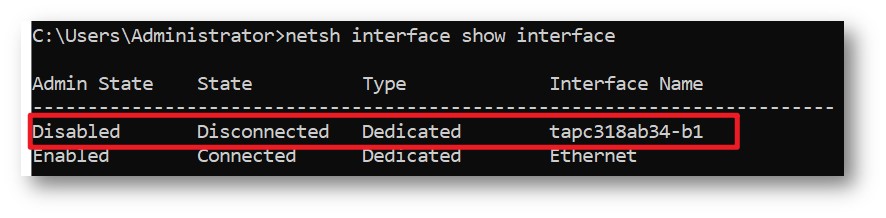
- enter
netsh interface show interfaceThe interface status has been disabled.
Or use the Windows GUI:
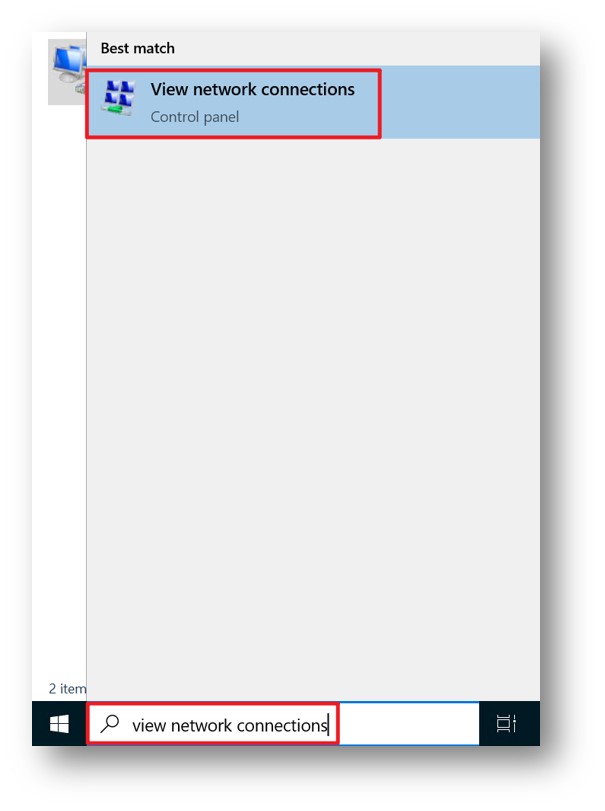
- Search for and enter "View Network Connections" to view the two connected virtual network interfaces.
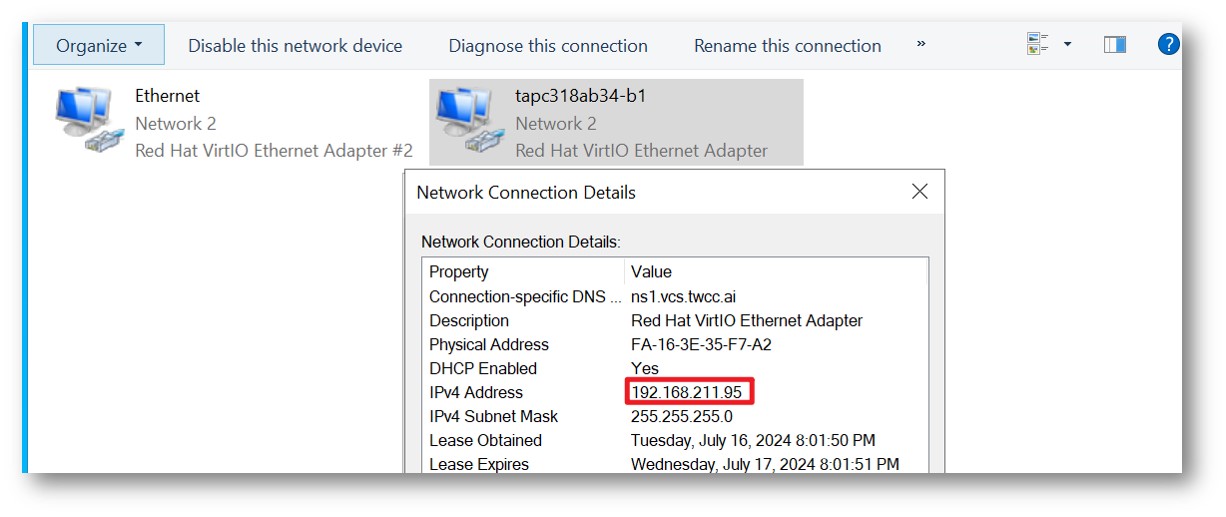
- Right-click on the interface > select "Status" > select "Details" to confirm the network card's private IP address, which can be compared with the interface on the platform.
- To disable an interface, simply right-click it.
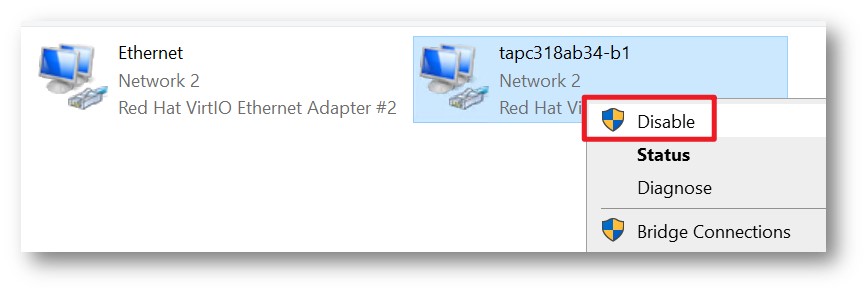
- Disable Complete
Step 4. Change to a static IP address and confirm the connection.
If you wish to continue using the original public IP (static IP), you can remove the IPs from both interfaces and then configure the original IP to connect to the VCS using the original IP.
- Remove IP:https://docs.twcc.ai/docs/user-guides/twcc/vcs/eip# Remove resources elastic-ip
- Configure IP: https://docs.twcc.ai/docs/user-guides/twcc/vcs/eip# provides elastic IP configuration for resources.
If your original IP was a floating IP, it will be recycled back to the resource pool after removal, and there is no guarantee that you can get the same IP back.
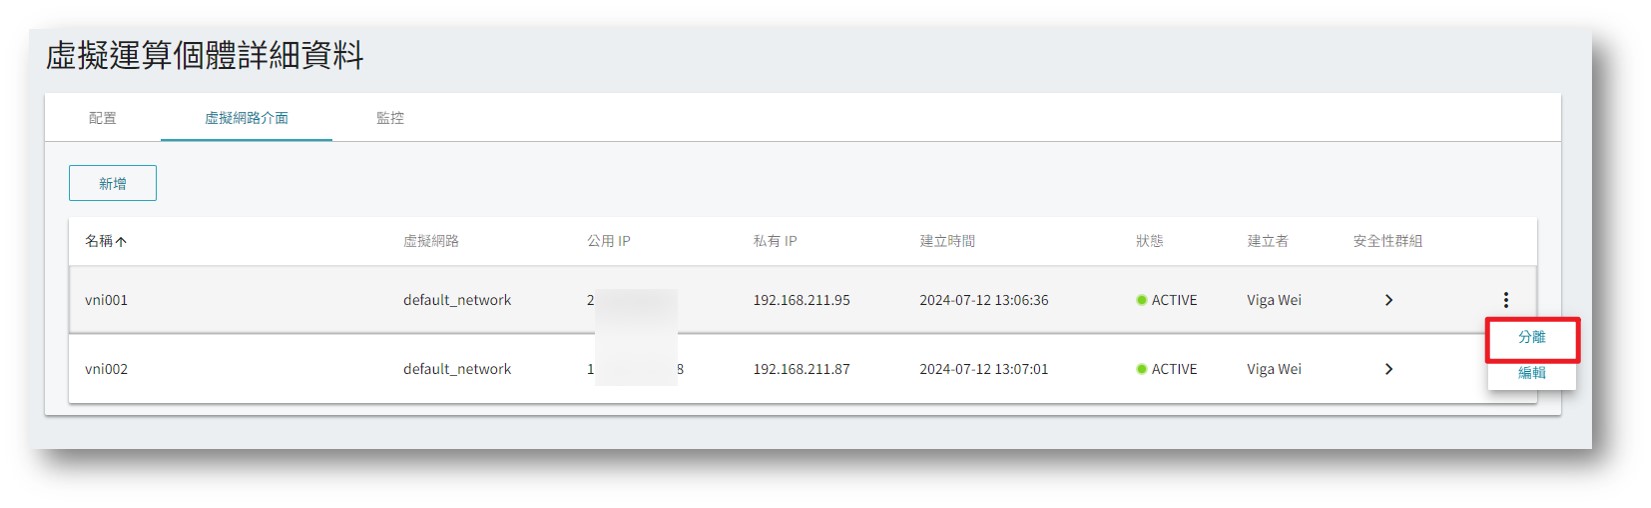
Step 5. Decouple the original virtual network interface.
Whether a virtual network interface can be separated from an individual depends on the nature of the interface:
- If the original interface is a dependent interface:
The interface's lifecycle changes along with the virtual entity, therefore the interface cannot be separated from the entity (buttons are grayed out). The interface will only disappear when the entity is deleted.
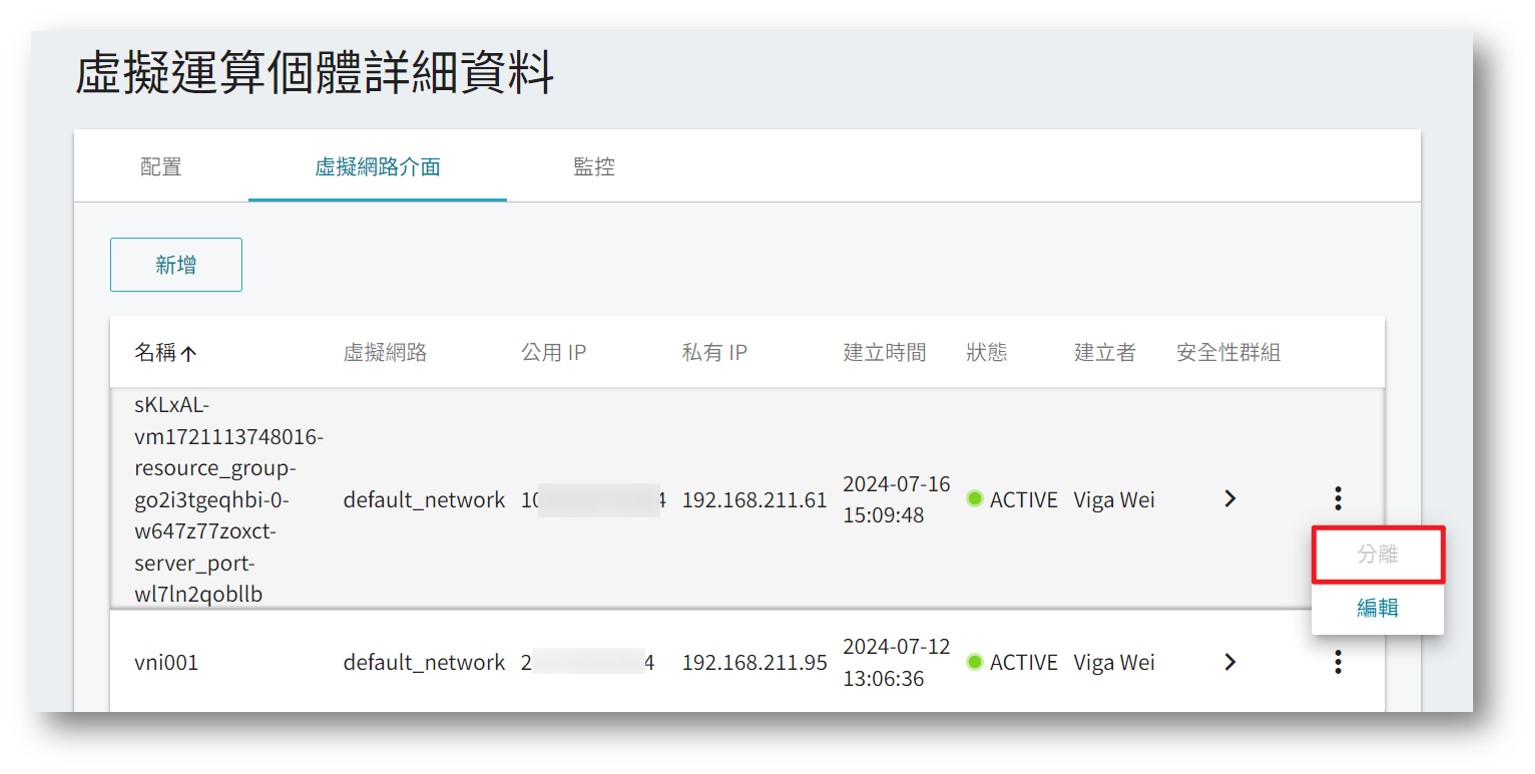
- If the original interface is an independent interface:
After confirming the static IP change is complete, you can detach the network interface from its original state and use it on other resources.